
Maps and mapping software have long been under-utilized as tools for family history research, but can be incredibly useful resources for genealogists of all skill levels.
Thanks to recent advances in the field of geospatial technology, family history researchers have never been better positioned to start using this technology to their advantage.
This two-part article will review a number of ways the family history researcher can leverage these tools to make more discoveries and form a greater, more holistic understanding of their ancestors' world.
The first part will introduce the technology and suggest ways to add your own family history information to a map. The second part will review how to import data others have created—digitized historical maps and other tools—and use it to analyze your own family history information in a geographic context.
If you’re interested in learning more about this subject, NYG&B members can watch a recorded webinar that covers both of these topics and more—Mapping Your New York Ancestors.
While these methods are particularly helpful for New York researchers, (these articles and the recorded webinar use examples from New York State), everything may be applied generally to research in any area of the world.
GIS and the Geospatial Revolution
A geographic information system (GIS) is a system used to store, manipulate, and analyze spatially referenced data. Most GIS today are computer programs—more simply, computer programs that display information on a map.
Many of us use GIS applications often. Google Maps or Apple Maps are very relatable examples that are dedicated to a specific function—navigating and exploring the world.
There are many GIS applications that exist for broader purposes—to allow users to add data to a map interface, and manipulate or analyze it in a variety of ways.
You might not have realized it, but we’re in the middle of a “geospatial revolution” in technology—people everywhere are inventing exciting uses for this technology, and GIS applications are becoming far more powerful, but most importantly - far more usable.
Google Earth: Free, Powerful, Easy-to-use
Google Earth is an excellent GIS application to use for the suggestions outlined below. It’s a powerful and usable program—and it’s free!
Download the desktop version of Google Earth for the optimal experience. There is a version you can use from within your web browser, but it’s not yet as useful as the desktop application, which is a relatively small program that can be run on most common operating systems and hardware.
Learning to use a program like Google Earth is very easy to do. There are many short, easy-to-follow tutorials available. It’s very easy to learn how to use this tool successfully for family history research.
This specific tutorial from Google Earth will equip you with the skills to do everything outlined in this article, though you will definitely benefit from other tutorial videos as well.
Here are some things you can do for family history research with Google Earth:
Add your ancestors to the map
We use all sorts of methods to organize the information of our family history. Some people have written notes, file systems, family trees, family group sheets, or other media that help us see information clearly and share our uncovered family history with others.
Think of a GIS application as a new, exciting way to organize your family history that allows you to analyze information and share your family stories in a geographic context.
With Google Earth, you can create and edit “placemarks”, which represent a single point on the map. When you add a placemark, you can drag it to any location on the map—this can be an address from your family history, or even a general area if you don’t have an exact address yet. You can also add additional notes, links to websites, and even images.
In this example, I have added a census record for an ancestor who lived in Manhattan in the 1800s:
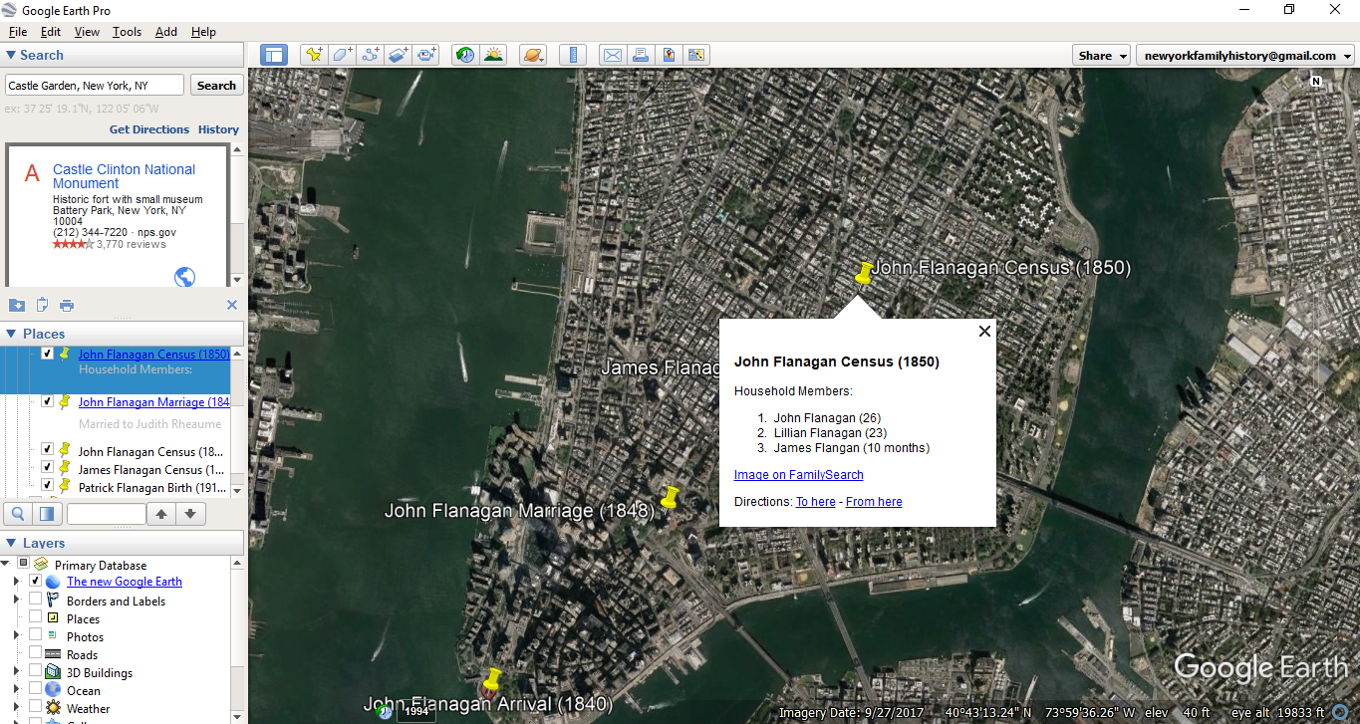
It’s up to you what information to add and how to display the events or individuals in your family history. Here, I have decided to list the other members of the household at that time, as well as a link that goes directly to the image of the census record.
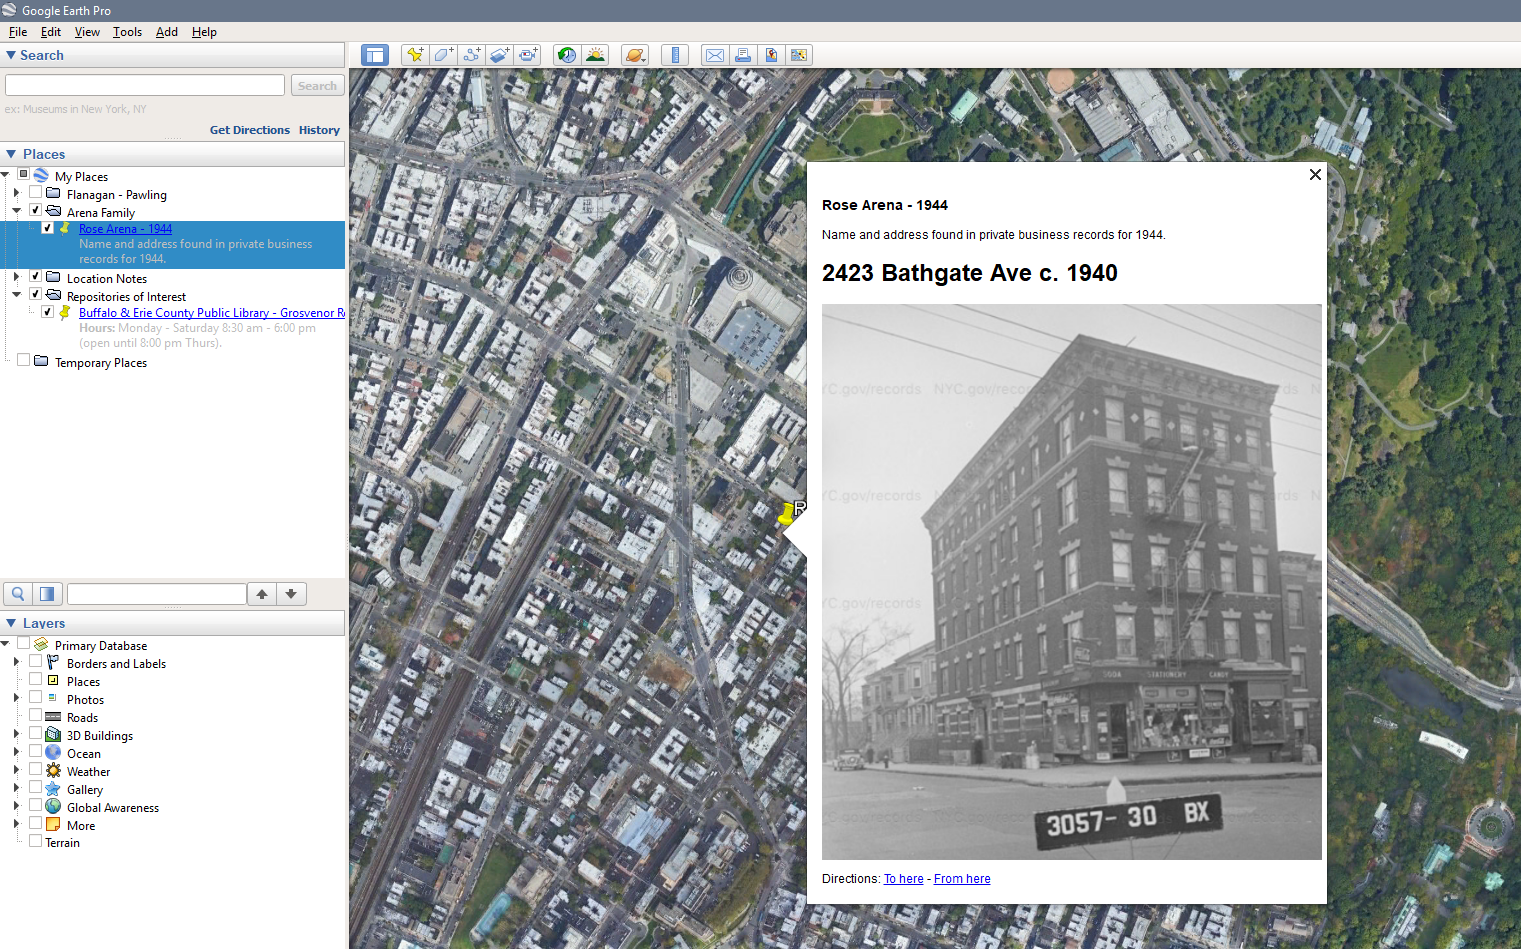
In this example, I attached an image of what my ancestor’s New York City building looked like in 1940 around the time she lived there:
Using a map can be a very interesting way to view the distribution of individuals or events in your family history, and is what I consider a crucial step in fully using Google Earth for family history.
Organize notes from location-centric research
If you’re facing a brick wall in your research, it’s a good idea to pull back and do some general research on the location(s) involved in the research question.
You will learn a lot about the physical and cultural landscape of your ancestors, but the information you discover will also help you form hypotheses that can break through the brick wall.
When doing this general location-centric research, you’ll undoubtedly come across information you will want to save and reference later. You can use Google Earth to add placemarks that contain need-to-know information about locations of interest.
In the example below, you can see the result of some location-based research I did about the city of Yonkers, New York. After reading about the record-keeping practices of this city, I noticed an important fact about civil birth, marriage, or death certificates—records from 1875—present are kept at the local level, but records after 1914 can also be found in the state library in Albany.

Not only will this note help my current research in Yonkers, but it will also be useful later. If I return to Yonkers for research on another line or ancestor, I’ll have these important location notes right there on the map to remind me.
Google Earth can also be really useful when planning a research trip. It’s absolutely essential to do solid preparation work before you actually travel to an area to research in brick-and-mortar repositories and libraries.
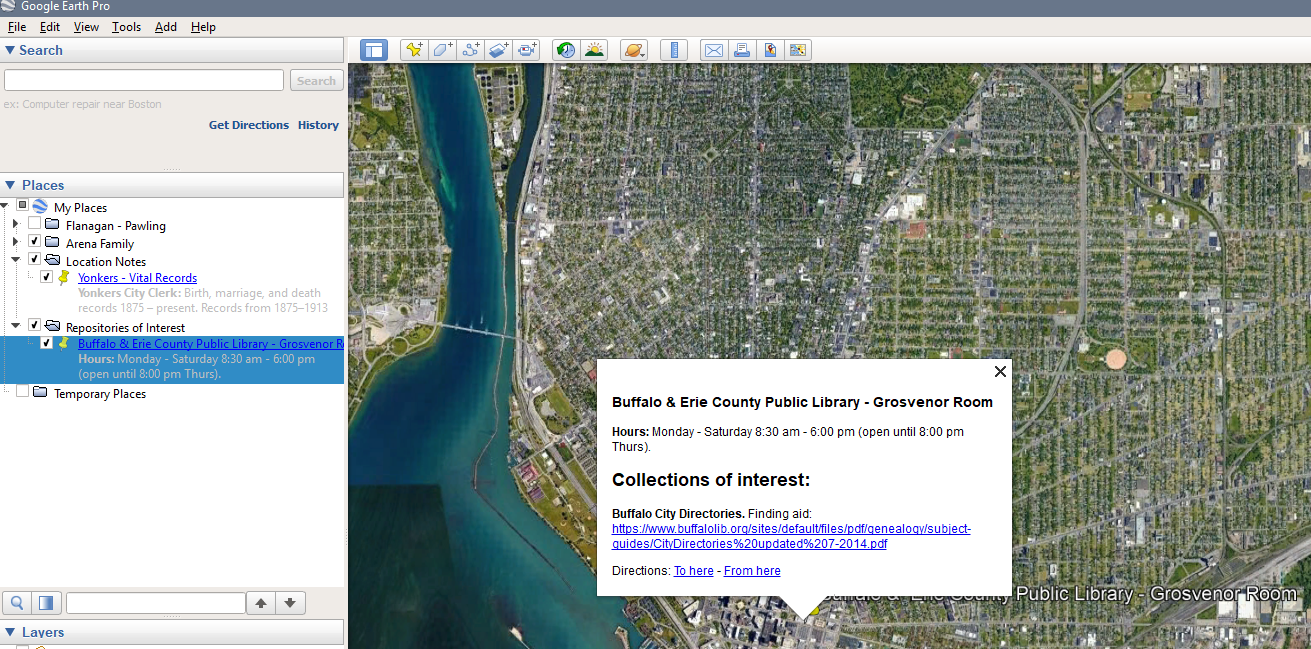
Google Earth is a great place to store information about your research plan. Find the location of the repository you plan to visit and create a placemark—you can store pertinent information, like the repository hours and link to the website. You can also identify record sets you would like to investigate or other useful information found in your preparation research.
Below, you will see some notes I created for the Erie County Public Library:
Plot places of interest for further research
In doing research, you may encounter locations of interest that don’t necessarily represent verified family history events (yet) but are possible leads for further investigation and research.
It’s a good idea to save these to the map too. The placemarks can store further notes and research about these locations, but seeing the locations on a map can also help you form hypotheses about the possible relevance of these locations.
This practice is especially effective when you use it in conjunction with importing data others have created, such as historical maps or boundaries.
In this example, I’m trying to locate the religious congregation my ancestors from Dutchess County attended, in hope of eventually finding them in the records:
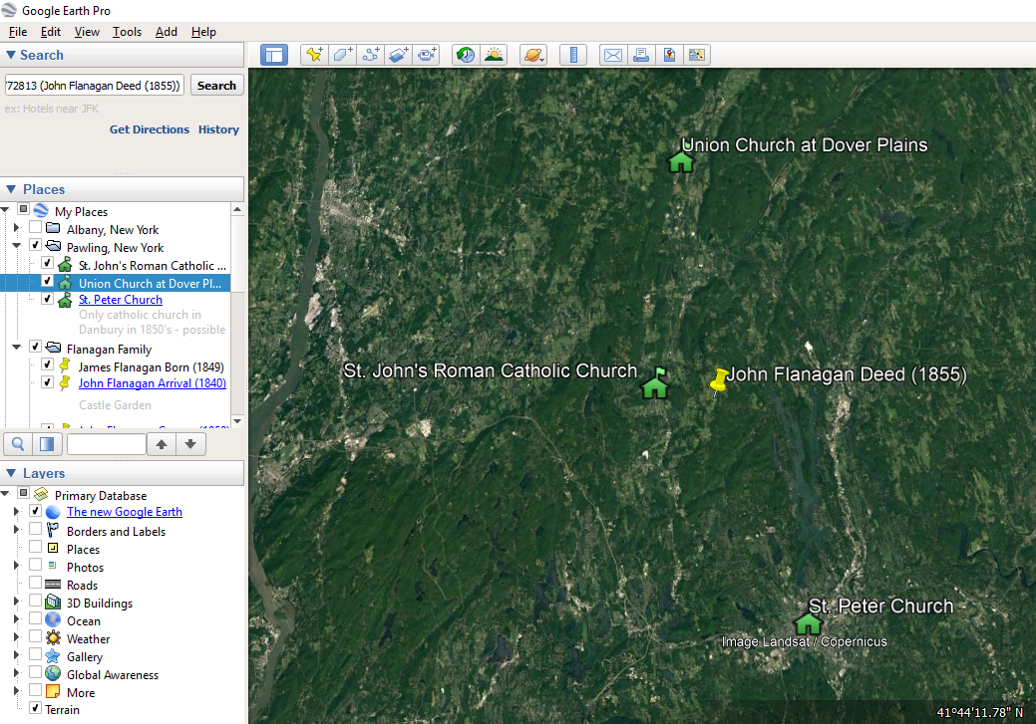
I know they were Catholics, so I did some background research to identify Catholic churches at the time when they were living in Pawling.
I have identified three candidates, which I have added to the map. I was able to find exact addresses for two of them (which still exist today), and for a third, I was able to determine a very approximate location based on a description in an old county history.
Doing something like this is helpful to me for a few reasons. First of all, it’s a good way to store and organize the names and locations of these churches. As I do more research, I can add useful notes, links, or images to the placemarks and easily return to them later.
But even more importantly, adding these locations to the map will help me form a hypothesis about which church to focus my investigation on.
Once I add in historical county boundaries and some digital historical maps, I will have more information that I can use to determine which churches may hold records on this family.
Conclusion: Add your own data & import historical maps
The goal of this article is to introduce you to Google Earth and how you can begin to use GIS applications to further your family history research.
The first step of this process is adding your own information to the map, whether it’s ancestors/events in your family history, important notes about the locations you’re researching, or possible locations of interest that need to be investigated further.
Now it’s time to download Google Earth and watch some of the easy-to-follow tutorial videos and add some placemarks to the map.
In part two, we discuss how to add some amazing context to the map by importing data that others have created and prepared for Google Earth.
We add a tool that allows you to view historical borders, which can be very useful for breaking through brick walls by finding records in locations you never would have thought to look.
We use rural digitized maps to analyze how topography affected your ancestors' lives and also look at some highly detailed urban maps that will help you recreate your ancestor’s neighborhood with an unbelievable level of detail.
If you would like to dive into those topics right away, NYG&B members can watch a recorded webinar Mapping Your New York Ancestors, which covers these topics and more in our webinar library.
Google Earth for Genealogy, Part 2: Adding Historical Maps & Data
More Genealogy Reading
-
New York Catholic records online: What you need to know
-
Big news out of the New York State Family History Conference
-
Researching Irish ancestors in New York State
-
7 resources to get you started with genetic genealogy
-
Surprising facts about immigration to New York
-
Finding Birth, Marriage, and Death Records in New York State